Google Earth Resources
(2007 - now)
If you have Google Earth installed on your computer, are familiar
with Google Earth and want to start flying around the area at once,
then download the kmz file below and double click on it. The file can be moved from Temporary Places to My Places if you want GE to start up with the Matienzo file loaded.
[Hint: delete any old MATIENZO CAVES file from Google Earth before loading / activating the new file.]
MATIENZO CAVES 240221.kmz
(21st Feb 2024
199Mb
file)
- Shows all the site positions
- Shows positions of archaeological sites only and / or sites documented with biological interest and / or unexplored sites and / or sites documented as continuing, or can be pushed and / or digging sites.
- Draughts, resurgences and sinks can also be shown as can dive sites.
- Contains all (600+) cave surveys as overlays. (Latest data: March 2023)
- Shows the 2023 caving permit area (and the previous areas).
- Shows all cave line surveys. (Latest data: March 2023)
- Has 9 scanned maps as an overlay for the whole area
- Contains 2 small scale geological maps, one by Jason Lin and the other by Juan Carlos Fernández Gutiérrez (from the Matienzo 50 book).
- Shows rose diagrams of passage directions for caves over 500m length by Patrick Warren. (Date: 2011)
- Shows place and area names, ie accommodation, restaurants and bars; names of hills and areas; positions and names of major sinks and resurgences
- Has a selection of Tours to fly in and around the area
Supplied by Luis Miguel Casabona Sevillano
Google Earth
Google Earth Pro allows geographical information to be displayed on satellite
photos of the earth's surface. These photos can also acquire height information,
allowing the user to fly through virtual landscapes. (However, the match
between photo and underlying contours is not perfect as can be seen in a
number of places around Matienzo). In the Matienzo context, GE currently
allows entrance relationships to be seen and various subsets, eg digs, unexplored
sites, to be investigated. Google Earth allows users to import their
own data: overlays, eg a geological map, contour map or cave survey; photos;
pinpoint features, eg cave entrances, and tracks, eg cave centre lines. There
is also the facility to tour the region by following predefined (or user-defined)
paths. Once sites have been clicked on, a brief description can be given
with links to other files.
The Google Earth application sits on the user's computer and downloads
the required satellite photos when activated. To download Google Earth
click here. The Matienzo Caves file (downloaded
above) can also sit on the user's computer or be integrated into GE for instant
access. To get the most out of the Matienzo Caves data, some familiarity with GE
is desirable, and the remainder of the page suggests ways in which the Matienzo
Caves file can be integrated and used with Google Earth.
The organisation of Matienzo data in Google Earth (Updated January 2015 using GE version 7.1.2.2041)
(It may be useful to print out this section while using Google
Earth).
The sidebar in GE allows data to be structured in a file hierarchy. The way
in which the Matienzo data is organised and accessed is shown in the screenshots
below. The sidebar contains a Places panel as well as panels for
Search and Layers. The downloaded file can be double-clicked
or dragged into Google Earth. In both cases the file shows up in the
Temporary Places folder. If you intend to keep the file for future
use it should be should be immediately moved to the My Places folder:
right click on the MATIENZO CAVES file within Temporary Places and
choose Save to My Places
To give a better indication of the terrain and to emphasise features, the
vertical scale should be increased to about 1.5. (This can be altered on
the top menu bar: Tools / Options and then alter the value
in the 3d View tab.)
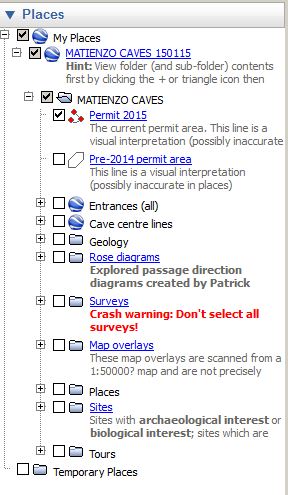 1: Clicking on the + or - boxes (or triangle icon, depending on the operating system or Windows selection) expands or closes the file
structure. (The image on the left shows that the MATIENZO CAVES 150115 folder has
been opened then MATIENZO CAVES to show the contents.) Double-clicking on MATIENZO
will zoom to the appropriate area.
1: Clicking on the + or - boxes (or triangle icon, depending on the operating system or Windows selection) expands or closes the file
structure. (The image on the left shows that the MATIENZO CAVES 150115 folder has
been opened then MATIENZO CAVES to show the contents.) Double-clicking on MATIENZO
will zoom to the appropriate area.A tick in any tick box displays the relevant files on the Google Earth display.
A tick against a folder will display all the files and folders within. (There is one tick box marked on the left to display the 2015 permit. You may wish at this point to un-tick all the superfluous data in the Layers and Places panels.)
A slider at the bottom of the Places panel controls the transparency of any selected item.
The two buttons start and stop a Tour.
Clicking on a pin in the main window opens up a bubble with site details and a link to the web page description for that site.
2: One way to start up Matienzo Google Earth is to have the Entrances (all) file ticked (to show all the sites). If all the cave lines are required then tick the Cave centre lines folder.
3: The cave centre lines will display themselves draped over the landscape. If the lines are given their correct altitude (in Properties) they will (obviously) disappear underground. There is currently no way to display detail below the surface: the satellite photos cannot be made transparent. For a different view of the cave centre lines, the Terrain can be turned off (in the Layers panel) and the lines then show over the flat photos or flat contour maps overlays (or a combined view using transparency on the various layers). Only Google Earth version 6 or earlier allows the Terrain to be turned off. In version 7, the Terrain Elevation Exaggeration can be set to 0.01.
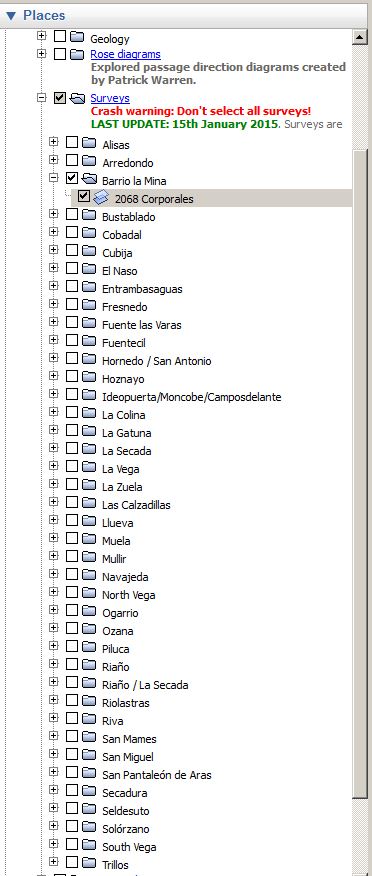 4: More than 560 Cave surveys are organised in areas
as shown on the left. Double clicking on an area name, e.g. Barrio La Mina, will
open up (or close) the folder showing / hiding all the available surveys.
At the same time GE will zoom to the extents of the surveys in the folder.
4: More than 560 Cave surveys are organised in areas
as shown on the left. Double clicking on an area name, e.g. Barrio La Mina, will
open up (or close) the folder showing / hiding all the available surveys.
At the same time GE will zoom to the extents of the surveys in the folder. Clicking the tick box to the left of an area will show all of the surveys as overlays on the satellite photos.
Clicking the tick box to the left of an individual survey will display that survey.
Double clicking the number / name of a survey will prompt Google Earth to zoom to the extent of the survey.
As with the cave lines, surveys can be draped over the landscape, but are better viewed with the Terrain turned off, if version 6 or earlier of Google Earth is being used. In version 7, the Terrain Elevation Exaggeration can be set to 0.01.
Cave surveys can be made transparent by using the slider at the bottom of the Places pane.
Areas are fuzzily defined and overlap, so that surveys may not be in the expected folders, e.g. Seldesuto and North Vega or La Secada and El Naso. Some caves are to be found on a single sheet with other sites, e.g. the South Vega System. If the expected survey can't be found, tick the whole area and scan through the displayed surveys.
Placing and scaling these surveys has highlighted a number of inaccuracies. Don't expect the surveys to perfectly match the centre lines. Surveys showing multiple entrances will almost certainly not match precisely until all entrances are GPS'ed.
[Size, orientation and position of surveys can be adjusted by right-clicking over a survey name in the left panel and selecting Properties.]
If the Cave Lines folder is chosen and visible, the Terrain should be turned off to show a true plan view.
6: The Places folder contains 4 folders: Names/Features is dealt with below in section 7. When Accommodation is ticked all the contents (ie the places offering accommodation around Matienzo) are shown.
Similarly with Restaurants and Bars.
Some Hostelries have all three symbols.
7: Names/Features contains a draft Hydrology folder containing Sinks and Resurgences folders. The remaining folders name surface features and areas in various categories.
Ticking Names/Features will activate all the folders and files lower down in the file structure. Ticking just Hills will only show the names of the summits around the depression.
8: The Sites folder contains 5 files which show subsets of the data, ie unexplored sites (mat-unex-yymmdd), unfinished sites with leads to push (mat-cont-yymmdd), archaeological sites (mat-arch-yymmdd), sites with biological interest (mat-biol-yymmdd) and digs (mat-digs-yymmdd).
For example, if only sites with archaeological interest are required, then un-tick the mat-area-yymmdd file (in the MATIENZO folder) and choose the mat-arch-yymmdd file inside the Sites folder.
There is no point in having mat-area and the Sites folder ticked as most sites will be duplicated on screen, slowing up the computer.
9: The Tours folder contains a number of pre-defined tours or fly-arounds. When activated, GE follows an invisible path or line. (Even though the S Vega circle tour is ticked, nothing is seen on the screen as the line is zero width). The user can also define his or her own path and hence devise a tour. (I'd like to include more in this section!)
To activate a Tour, click on the description, eg S Vega circle and either press ctrl-Alt-P or click the arrow symbol at the base of the Places panel. A tour can be stopped by clicking the square or by pressing ctrl-Alt-P.
Various tours parameters are controlled by the Google Earth Optionswindow shown above, and these values should be used when touring on these paths.
10: Other hints and tips:
- Double-clicking on the file or folder name in the Places panel makes Google Earth zoom to the relevant area
- Right-clicking on a file name, track or site gives a menu from where it is possible to change properties. Tracks (cave lines) can have a colour change or have the track extended to the ground - not very useful?
- If you mess up completely, the MATIENZO file can be deleted in My Places from the right-click menu and then re-loaded.
-
It doesn't seem possible to search for a site, e.g. Vallina, (they don't
appear in the top, Search panel) but scrolling down in the
Places panel with Entrances (all) expanded and
double-clicking on site 733 will zoom into the Vallina area with the
entrance centred in the map window.
It may be useful to have an alternative file in alphabetical order. It would also be possible to have a file that showed numbers and names on the pins, although this likely to overcrowd the screen. - In addition, GE will also give driving directions (on known roads) to any restaurant, cave, resurgence, etc. Right-clicking on a screen pin or label in the Places window will often give the opportunity to click Directions from here or Directions to here. The appropriate box in the top Search panel will be filled with the correct lat / long. A similar process will then fill in the other box. As an example, try "site 733 Vallina" (directions to) and "Bar La Panaderia" (directions from). When both boxes are complete, the route is calculated and shown on screen. The route can also be followed (as a tour) by clicking the arrow button at the base of the Search panel.
11: The different coloured and lettered pin meanings are fairly obvious and shown below. Some sites can be two or more, for example, archaeological sites and digs - but only one symbol is shown.
 Cyan pin, marked "D" with cyan text
 Grey circle with grey text
It is well worth while spending a few hours (!) exploring the capabilities of the Google Earth application.
There are two methods of flying: ctrl-G gives a joy stick approach, while ctrl-T is the default which is used. Possibly the best way to fly around the depression is to use the compass at the top right and to drag the centre circle in the required direction. A height of 1.5km (allowing for the vertical exaggeration of 1.5) allows a gentle glide over the depression with Muela, Mullir and the Hoya de Yusa depression very noticeable. If the ground appears flat, make sure the Terrain is activated.
Any set of chosen points can be toured, ie a flight made to each point in turn with the bubble appearing for a couple of seconds (if your Options are set correctly). For example, with all sites showing (Entrances (all) ticked) but the Sites/Archaeological folder chosen (single click on the file name - the folder is highlighted) the Tour is activated by clicking on the arrow triangle at the base of the Places panel. The archaeological sites are visited amongst all the others. The tour can be paused and web site descriptions investigated.
Feedback and Future Development
If you have any suggestions for enhancements or
spot any errors or suspect data then please contact me juancorrin[at]matienzo.org.uk.
I'll start the list for version 1.1 with
- Provide a link in the balloon to the Survex 3d file
- Provide a proper hydrological layer with proven / postulated water
routes
Juan Corrin
29/11/2007 - now